Multiple Exposure Tips
Part I
Roger Devore
Most middle to upper level cameras come with the capability of making multiple exposures, or exposing the same frame film with more than one image. This camera function can be a creative tool and can also be used to help control some difficult exposure problems. Learning about multiple exposure possibilities will add to your technical skills and make you a more creative photographer.
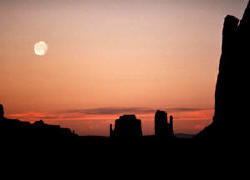
Let’s examine some examples of situations that might be enhanced by using multiple exposure. First, let’s talk about a late evening (or early morning) scene involving the moon in the composition. The moon is lit by reflective sunlight and is very bright compared to low light scenes of evenings and mornings. If you expose for the scene, then the moon will be overexposed and washed out. If you expose for the moon, the rest of the scene will be without detail and very dark. The solution to the problem is to make two separate exposures. Expose the scene normally and make the first exposure, then expose the second exposure just for the moon. Obviously you will need to make sure the moon is not in the first exposure frame and then place it where ever you like in the frame for the second exposure. You can zoom in and make the moon bigger for a more dramatic effect or even change lenses for the second exposure. A good exposure guideline for the moon is f 11 at a shutter speed of one over your film speed, or 1/50 of a second for Fuji Velvia. This is a variation of the sunny sixteen rule, and I like to call it the lunny 11 rule. With this technique, you can expose the moon perfectly, still seeing details, and the low light scene will also have what ever exposure you prefer, making a much more pleasing image than with one exposure and the moon overly exposed and washed out.
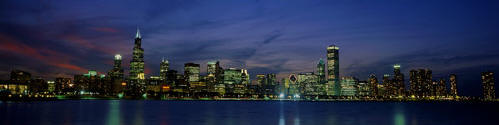
I also like to use a double exposure technique to do night images of city scenes. The first exposure is made after sunset with any available sunset color still visible in the sky. I meter off the clouds or sky and under expose the exposure by one stop. This technique will provide some light in the sky (not totally dark) and the under exposure will make the final image still look like night time. We have now exposed the entire scene except for the city lights that are not yet very visible. The second exposure will expose only the lights because we will wait until everything else has gone dark after sunset. In this situation it is very important that your camera does not move between exposures. Any, even slight movement, and the lights will not align with their source (buildings, etc). The second exposure will occur maybe as long as an hour after the first, you want the sky to be totally dark. If you like the star burst effect of point light sources, set your f/stop to a large number (small opening) for the second exposure. I like to use f 22. The exposure of most city night scenes do not have great variations, so you can do some exposure tests some night and use the results of your favorite exposure to become your standard night exposure for the city lights. The second exposure will be made at this predetermined exposure. This double exposure technique will result in pleasing night scenes with still some light in the sky and the lights of the city not over exposed and burned out. Make sure you take your flashlight along because you will need it for the second exposure. If the moon is up, you can add it and make you image a triple exposure by combing the two techniques discussed above.
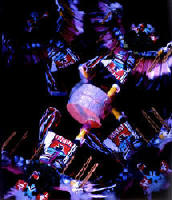
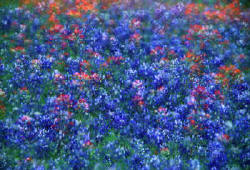
These above techniques discuss using multiple exposure procedures to overcome extremely difficult exposure problems. Now let’s look at some ways to be creative using multiple exposure. By overlaying exposures on one frame of film, you can achieve a layering, transparent effect not easily duplicated by any other method. Let’s assume you are standing before a field of brightly colored spring flowers. The flowers are spectacular, but the field could be more densely covered with the flowers. By using multiple exposures, you can fill in the bare areas of the scene with blooms. One technique is to use four exposures and place the same dominate group of flowers in a different corner or the frame for each exposure. This will allow you to fill you frame with the saturated color of the flowers. The frame will be layered and transparent looking and will have a soft, different appearance cause by the four separate exposures
Some other ideas for multiple exposure:
– make a close up of a flower and double expose it with the field where it grows.
-make two exposures exactly the same composition, but one exposure sharp and the second slightly out of focus.
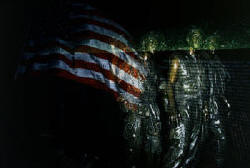
-overlay any objects that have something in common. For example, a participant in my Washington D.C. workshop chose to double expose the Lincoln statue in the Lincoln Memorial with the words of the Gettysburg address sculptured on the wall.
Use you own imagination and creativity to discover your own ideas for multiple exposure.
Now let’s examine exposing multiple exposure images to obtain the correct exposure on your combined image. If are overlaying exposures on top of one another in you image, then you must compensate the exposure of each or else the resulting final exposure will be over exposed. But if you are doing multiple exposures and exposing separate areas of the frame then no compensation is necessary. Some examples of this are the moon and night city examples mentioned above. Because each exposure is exposing a different, separate part of the frame, no compensation is required for the final image. The moon is placed in an already dark area in the first example and the same is true of the city lights in the second example.
The images that require compensation are a bit more complicated and somewhat more difficult to grasp. The exposure compensation needed for each individual exposure is equal to the power of two equal to the number of exposures you are making (i.e., the power number itself). This explanation sounds much more difficult than it is. Examine the following data:
2 to the 0 power = 1, so if you are making one exposure no compensation is necessary.
2 to the 1 power = 2, so if you are making 2 exposures, each one must be 1 stop under exposed.
2 to the 2nd power = 4, so if you are making 4 exposures each one must be 2 stops under exposed.
2 to the 3rd power = 8, so if you are making 8 exposures, each one must be 3 stops under exposed.
You get the idea. You can also interpolate between examples. Let’s say you are composing a image that has 3 exposures. 2 exposures, each one is 1 stop under. 4 exposures, each one is 2 stops under, so 3 exposures, each one would be 1.5 stops under exposed.
These exposure compensations assume each of the multiple exposures will have the same exposure. That does not have to be true. Suppose you want one exposure to be more dominate on your final image than the other. Let’s look at the Lincoln Memorial example discussed above. Suppose you decide you like the idea of the double exposure, but you decide the statue should be more dominant in you final image and the Gettysburg address words should have a lesser role. You can do that by changing the exposures of each. With two exposures, if they are equal, each is one stop under exposed for a total of 2 stops total underexposure for the final image (I understand that the resultant image is not 2 stops underexposed, but if you follow this logic, you will have not problem making the adjustments discussed). As long as you maintain this total 2 stops under, you can make the two exposure however you want. In my example, you could under expose the statue .5 stops and the Gettysburg address exposure 1.5 stops under and you would still get the same final exposure in your image, but the statue would be more dominant (it has more exposure) than the words of the address. You can apply this procedure to any number exposures. Try to experiment to see which combinations you like best.
If all this math seems way too complicated for you, you can also compensate in a much easier way, simply multiply your film speed by the number of exposures you are making and set that number in your film ISO setting. This technique will obtain a correct exposure, but takes away the ability to make one of the exposures more dominant than another.
Try using that multiple exposure functions on you cameras and see what kind of creative, new ideas you can create!


EXPOSURES of ATTACHED IMAGES
Monument Valley moon – 2 exposures
Chicago Panoramic – 2 exposures
Orange Saki – 2 exposures
Navajo Reflection – 2 exposures plus mirror
Vietnam Memorial – 3 exposures
Soccer Illusion – 3 exposures
Texas Wildflowers – 4 exposures